Beauty treatments and skin care routine have been associated with women since ages. One such ingredient which is common yet magical for healthy and glowing skin is Aloe Vera.
Aloe Vera is a commonly used ingredient in herbal concoctions, medicines and cosmetics. It dates back to history BC where an Egyptian document reports the use of aloe Vera gel with other agents to cure various skin and other internal disorders.
The secret of Aloe Vera lies in its long, succulent leaves – it is the gel that makes aloe vera a magical plant. It contains beneficial compounds like polysaccharides, lectins and mannans etc. The main constituent is water but it also packs inside a bulk of minerals, vitamins and many active compounds. The beauty of the plant lies in the fact that this ingredient can be used in almost any form – cream or gel based which makes it ideal to be marketed as a product in cosmetic and medical fields.
Benefits of Aloe vera:
It is an excellent moisturizer for skin. Aloe Vera gel rejuvenates the skin, hydrates it and keeps your skin looking fresh all the times.
Aloe Vera gel has anti-microbial properties making it ideal to treat acne and pimples.
It is a great naturally occurring anti-oxidant.
It is known to retain your skin’s firmness – making it a good anti-aging cream.
Aloe Vera is known to reduce pain and inflammation – both internally and externally. It is medicinally also used to treat sun burns, insect bites, eczema, cuts and wounds.
Below are some of the best Aloe vera face mask recipes that can be done at home at one comfort.If your making the Aloe vera gel at home and want to use it regularly, then store the extracted gel in a air tight container in the fridge.This way the gel will be in a good condition to use it later.
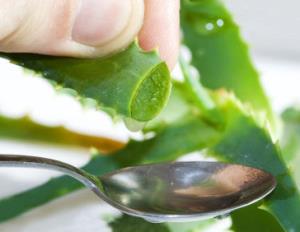
How to extract Aloe Vera gel at home:
Choose the leaves of the plant carefully, the leaves in the middle of the plant contains most of the gel as they leaf are juicer, soft and widest there.
Cut the leaves at an angle from the base of the plant.
Now, stand the leaves upright for 15 minutes to allow the sap to drain out. The sap is a yellow colored fluid which will ooze out the moment you cut the leaf. Allow it to drain out completely.
Later on wash the leaves to remove the remaining sap from the leaves.
Lay the leaves flat on cutting board and carefully cut the sides of the leaves which will contain thorns from both the sides of the leaves. Once that is done, you need to peel off the green layer of the leaf and dice the transparent gel into cubes.
Alternatively, you can also slice the leaves into two halves lengthwise from top of bottom and scrape off the transparent gel with the help of the spoon.
Aloe Vera face packs:
Here we show how to make Aloe Vera face packs at home:
1. Aloe Vera Face Pack for Glowing skin :
Ingredients: Aloe vera, Turmeric, Honey, Milk, Rose water.
Method:
Make a paste with a pinch of turmeric,1 teaspoon of Honey, 1 teaspoon of milk and few drops of rose water.
Add the aloe vera gel to the paste and mix it well.If you have cut the gel into cubes, you will need to blend the
whole mixture to form the paste.
Apply the paste on to the face and neck evenly for about 20 minutes.
Then wash if off with Luke warm or cold water and pat dry with a clean towel.
2. Aloe Vera Face Pack for Tan removal:
Ingredients: Aloe vera, Lemon Juice.
Skin tanning is a common problem in India and it is also very difficult to get rid of the tan easily.Try this simple and effective pack for tan removal.
Method:
Apply a paste of aloe vera gel and lemon juice on the affected area.Leave it on for 10 mins and wash it off.
Alternatively, you can also make a mixture of the same and apply the mix with help of a cotton ball on the affected areas to treat them.
3. Aloe Vera Face Pack to treat Pigmentation marks:
Ingredients: Aloe vera, Rose water.
Method:
Age spots, pimple marks, pigmentation marks, burn or injury marks can be treated using aloe vera gel.
Just make a paste of aloe vera extract and rose water and apply it on face for 20 minutes. Rinse off using cold water.
This pack acts as a fairness pack also. The paste must be massaged for 2-3 mins onto the face before rinsing it off to cleanse the pores of the face.
4. Aloe Vera Detox – Pack :
Ingredients: Aloe vera, Mango fruit, Lime juice.
Method:
Blend the aloe gel extract along with cut pieces of mango fruit.
Add lime juice to the paste and apply it on your face for 20 mins before rinsing it with cold water.
This pack will detoxify your skin and freshens it.
5. Aloe Vera Face Pack for oily skin and Acne Prone Skin:
Ingredients: Aloe vera leaf, Honey.
Method:
Boil aloe vera leaf in water and grind it to form a paste.
Add honey to the paste and apply it on the face or o for 20 minutes and rinse off with cold water.
Follow this every week to treat oily,acne prone skin and get a clear skin.
6. Aloe Vera Face Mask for Sensitive skin:
Ingredients: Aloe vera, Cucumber juice, Yogurt, Rose oil.
Method:
Make a smooth paste of aloe vera gel, cucumber juice and yogurt. Add few drops of rose or any other essential oil.
Apply and let it sit for 15 minutes before rinsing it with cold water.
This paste will get rid of oil, dirt and impurities from your skin leaving you feeling clean and refreshed.
7. Aloe Vera Face Pack for Dry Skin:
Ingredients: Aloe vera, Cottage cheese, Dates, Cucumber, Lemon juice.
Method:
Blend two tablespoon each of cottage cheese Aloe Vera gel. Add few seedless dates, cucumber slices and a bit of lemon juice and blend again.
You can make this paste in bulk and store it in the fridge for a long time also.
Apply the paste on your face and neck and let it sit for 30 minutes. Rinse off with cold water followed by lukewarm water and lastly again with cold water.
8. Aloe Vera Face Scrub for Dead skin:
Ingredients: Aloe vera, Cucumber, Oatmeal.
Method:
Blend cucumber dices and aloe vera gel to form a paste. Add oatmeal to this mixture and mix properly.
Spread the paste gently on your face and massage in circular motion.
Let it sit for 10 minutes or so before rinsing it off.
9. Aloe Vera Face Pack for Mature and Dry skin:
Ingredients: Aloe vera, Almonds.
Method:
Add crushed almonds to the aloe vera gel and mix properly to form a paste.
Apply on face and neck and let it sit for 15 minutes before you wash it off.
10. Aloe Vera Face Pack for Dry and Combination skin:
Ingredients: Aloe vera, olive oil, Shea butter.
Method:
Mash aloe vera gel, olive oil and shea butter to form a paste and apply on face and neck.
Leave it on for 15 minutes before rinsing it with cold water. This will seal in the moisture into your skin and leave it fresh and clean.
Try these 10 effective and easy aloe vera face packs regularly for a flawless glowing skin.
Showing posts with label Face. Show all posts
Sunday, 26 June 2016
Saturday, 25 June 2016
Whitening the Skin tips
Home RemediesIn addition to maintaining a balanced diet, there are also a number of home remedies made from natural ingredients that can help whiten your skin. These should be done regularly to obtain the best results.
Prepare a mixture of grated tomato with two or three drops of lime juice and apply it to your face. Leave it on for approximately 20 minutes and wash off. Do this twice a day if possible for 15 to 20 days.
Placing a sliced, raw potato on the skin and massaging it gently onto blemishes and red marks can help reduce them.
To help remove a tan and lighten the skin, mix oatmeal with curd and tomato juice. Massage gently onto your facial skin and leave it on for 20 minutes before washing it off with cold water.
Acne Face Map
So what are your skin problems trying to tell you? Let’s take a look:
Zones 1 & 2: Bladder & Digestive System.
Step it up sister. Breakouts in these areas mean you may need to hydrate and improve your diet. Drink more water and incorporate fresh fruits and veggies in your meal plans. A problem area in this location may also indicate a food allergy.
Zone 3: Liver.
Slow down party girl. A breakout in this area mean you may need to cut back on the cocktails and/or reduce your intake of dairy.
Zones 4 & 10 and 6 & 8: Kidneys.
Put down the Mocha Latte. If your ears (zone 4 and 10) feel hot or swollen the inflammation may be due to dehydration. Cut soda, caffeine and alcohol. The same goes for dark circles found in zones (6 &8). Hydrate and catch some Zzz’s.
Zones 5 & 9 : Respiratory System.
Be a Quitter. If you’re a smoker you may notice increased breakouts and broken capillaries in these areas. Take control of your health and commit to quit. If you have allergies you may experience frequent outbreaks in these zones as well. Acne in the lower part of your cheeks may also suggest dental issue like gingivitis.
Zones 7: Heart
Chill Out. A breakout in this area can be directly related to blood pressure. Check yours and make adjustments to your lifestyle if needed.
Zone 12: Stomach
Cleansing Queen. Your chin is linked to your small intestine so breakouts in this area may indicate a build-up of toxins or the need to incorporate more fiber in your diet. What better time to try our DIY Juice Cleanse?
Zones 11 & 13: Hormones.
Get Zen. High stress and other hormonal changes can cause breakouts in this area. If symptoms don’t ease up in a few days perhaps its time to make an appt with your Dr. to look into possible hormonal imbalances.
Zone 14: Illness
Prepare for battle. A breakout in this area can signal your body is fighting off a bacterial infection. Drink plenty of fluids, get lots of rest and load up on your vitamins.
How to Make a Face Mask for Uneven Skin Tone
This face mask helps to treat uneven skin tone. Uneven skin tone is a problem for most people, and this face mask makes it easy to help treat uneven skin tone without having to buy expensive products.
Things You'll Need
1/4 Cup of Yogurt
2 Tablespoons of Instant Oatmeal
1 Teaspoon Fresh Lemon Juice
Instructions
1
Cut the tomato in half and remove the seeds but leave the skin on. Process the tomato in a food processor, or in a blender. Process until smooth.
2
Stir the tomato mixture in to the yogurt gently until blended.
3
Stir in the oatmeal, and lemon juice. Be sure to use fresh squeezed lemon juice. Cover the mixture and place into the fridge for 10 minutes.
4
While the mixture is in the fridge, soak a towel in warm water. Place the towel over your face until the 10 minutes is up.
5
Cover the entire face (except the eye area) with the mixture. Massage the mixture into the skin lightly, then wait 15 minutes.
6
Rinse the mask off with cold water, then towel dry.
7
Use the mixture 1-2 times a week.
Exfoliator for the face
Mix papaya pulp with lemon juice and oatmeal/oats. Massage on & leave on for ten to 15 minutes and wash off with lukewarm water (men) then shave or use cold water then apply a moisturizer. Don’t forget, avoid the eye area. Try to avoid the sun as much as you can just on the day or rather leave the lemon juice out.
Exfoliator for the body: Salt of the EARTH! Salt is a wondrous beauty secret & there will be many more uses for it later on. For now we are going to do a home-made exfoliator. Easiest quickest most affordable and you don’t need to leave the house!
For 2 applications(+_) ( you can store this up to a week & a half)
A small bag of fine salt (rough salt can be quite abrasive)
2 table spoons of Olive oil ( almost all oil will work but avoid citrus oils)
6 tablespoons of Lemon Juice
2 tablespoons of Body wash
Mix all these ingredients together, add some water and there you have it!
Get into the shower & gently in circular motions massage the exfoliator onto the skin avoid sensitive areas. Then turn on the shower to wash off. While your skin is slightly damp apply some lotion or baby oil.
Blemish clearing masks
Don’t you agree that clear and glowing skin is the key to beautiful face? This is why many people with different skin types and different skin tones around the world struggle to clear off those facial blemishes.

There are a several treatments that claim to cure blemishes such as laser removal and surgeries. Markets are flooded with magic claiming blemish balms too but this couldn’t be affordable by everyone and might not suit many skin types too. Why should we take a risk? Rush to your kitchen and pick some ingredients. These ingredients can do wonder on your skin by clearing out those ugly blemishes and spots left by acne.
Juicy Strawberries
Who won’t like to munch some fresh strawberries? Not only good in taste, strawberry is a wonderful skin friendly fruit that contains abundant amount of antioxidants and Vitamin C. This can help you get rid of those blemishes. Simply take a couple of fresh ripen strawberries and mash them with diluted lemon juice. Spread this mixture all over your facial skin and relax for 20 minutes. Wash off wish fresh water after 20 minutes and pat dry. This strawberry mask treatment, when followed regularly removes the blemishes, spots and dark patches. If your skin type is dry, add a dash of honey to this blemish removing yummy strawberry pack. Twice a week is recommended.
Holy Basil
When it comes to herbal remedy for blemishes, the first thing that strikes on mind is basil. Its a wonderful herb that can provide your skin a cooling sensation with lots of goodness. The holy basil leaves can be simply collected and pasted to make a quick blemish mask. However, you can add few drops of rose water to this paste to enjoy the refreshing herbal feel. So isn’t that a quick mask? Use this mask at least thrice every week to experience the wonder. You would be the owner of clean and clear, blemish free glowing skin within few weeks!
Lemon and Orange
Citrus fruits are very effective when it comes to scars, and they do clears out all the blemishes if used in a proper way. Oily skins would be delighted with citrus juices as it naturally improves the skin texture and controls excess oiliness. To get rid of your blemishes fast, take a teaspoon of orange juice and lemon juice and mix them together. Add a few drops of rose water to this juice mixture to balance its acidity. Now using a soft cotton pad, gently apply this fruit serum on your face and leave on for 15 minutes. Let the fruit acids work on your skin and naturally peel the blemishes and dead skin cells. Wash off with cold water and pat dry. This process can be followed every other day to achieve that younger radiant skin without any traces of blemishes.
Care for Normal Facial Skin (Face Masks for Cleansing and Fairness):
• The skin type is considered normal, when there is a right oil and moisture balance• In normal skin,
o Skin tone is even
o There are usually no spots or blemishes
• Use natural face masks to get a glowing and a healthy skin
Natural face mask using banana, yogurt and honey:
1. Mash half a banana
2. Add 2 tbsp of yogurt
3. Add 1 tbsp of honey
4. Mix well
5. Apply on the face taking care to avoid the eyes
6. Leave for 15 min
7. Wash off with cold water
Natural face mask using yogurt and orange:
1. Take 1 tbsp of yogurt
2. Add juice of ¼ of an orange
3. Mix well
4. Apply on the face taking care to avoid the eyes
5. Leave for 5 min and then wash it off
7 Home Remedies to Relieve a Sunburn
People who like to say an ounce of prevention is worth a pound of cure are smug jerks, especially when it comes to sunburns. While they were eating spoonfuls of tomato paste, canned flamingo, and fish oil, nibbling on grape seeds, using portable vitamin D test kits, and smearing green tea all over their bodies, sure, they didn’t get burned, but were they really living? Because you sure were. You were out there in the sun, just basking in it, arms outstretched to accept its vibrant rays like it was a commercial for a venereal disease medication. You may have gotten a little baked, a little too much color, but it was well worth it… right?Well, now you’ve gotta deal with this sunburn business. It’s red, it hurts, it’s veritably unhealthy, and you’re about to start peeling. What do you do? How can you soothe the flaming epidermis? How can you halt, or perhaps even reverse the damage before it gets out of hand?
Recent research has apparently found the culprit responsible for a sunburn’s pain: an inflammatory molecule called CXCL5. CXCL5 is a chemokine, a protein that recruits inflammatory immune cells to damaged tissue. In sunburned tissue, researchers found that CXCL5 was present in large quantities. Later, they found that as sunburned rats healed, an antibody began specifically targeting and reducing CXCL5 levels. This reduced pain. As of now, there exists no known home remedy (or pharmaceutical remedy) for triggering CXCL5 antibodies – if that’s even something we want to mess around with, since pain exists for a reason – but there are many home remedies for dealing with the pain.
Yes, home remedies for sunburns are plentiful, but few have anything to back them up but hearsay and anecdote. Anecdote can be incredibly useful (I’ve included some of the more interesting ones below), but let’s also take a look to see which remedies, if any, have supporting evidence.
Aloe Vera
Aloe vera is the classic remedy. You get a bad sunburn and almost anyone’s initial response is “Apply some aloe.” Is this advice warranted? Well, the actual aloe vera plant has over two millennia of history as a medicine across many traditional cultures spanning multiple regions, including China, India, Latin America, Japan, Russia, and Africa. Modern research has confirmed its effects on blood lipids, glucose tolerance, wound healing (has been shown to slow and speed up healing rates in different studies), and first- and second-degree burn recovery, but, strangely enough, not on sunburn. It neither prevents nor heals sunburns. That said, it does appear to soothe the pain associated with sunburns, so go ahead and apply away.
Kukui Nut Oil
The kukui tree was introduced to the Hawaiian islands roughly 1,500 years ago by early Polynesian explorers. It was henceforth and hitherto employed by the islands’ inhabitants in both medical and nonmedical arenas, in particular the oil from the kukui nut. Kukui nut oil was used as fuel, as a laxative, as a topical joint pain and arthritis reliever, and, most famously, as a reliever of skin conditions – including sunburn. The oil’s efficacy has never been “proven,” but I think 1,500 years of steady use (PDF) by a sunbaked population with extensive sunburn experience elevates kukui nut oil bey0nd mere anecdote.
Topical Vitamin E
Another popular remedy is to break open capsules of vitamin E and rub it into the affected area of the skin. Does it work? Perhaps so. One study on hairless mice exposed to UVB found that applying a common vitamin E supplement (tocopherol acetate) to the skin immediately after exposure lessened the sun damage. Even applying the vitamin E eight hours after exposure helped, but the effect was reduced the longer they waited.
Topical Black Tea
Last week, I mentioned how the polyphenols in tea leaves can improve your skin’s resistance to UV radiation when they’re ingested, but it appears that topical tea application can soothe and perhaps speed up the healing of sunburns. For a detailed tutorial on how to do it, check out this great article on Instructables (complete with detailed pictures). I’ve also heard good things about sharing a cool bath with several tea bags, and I’ve got a friend who saves all her used tea bags for topical application during the summer months. She’ll soak them for ten seconds in cool water, and then just slap them on to the burn.
Milk
You don’t have to be a lacto-paleo to embrace the topical benefits of dairy, according to one dermatologist. She recommends applying cool (“not cold”) milk to your sunburns, using gauze or clean cloth, and claims that “the milk will create a protein film that helps ease the discomfort.” I would imagine grass-fed, raw milk from Jersey cows with A2 casein would work best (I never saw a sunburnt Masai!), but it probably isn’t required.
Vinegar
One part vinegar to one part water, mixed together in a spray bottle and applied directly to the sunburn is supposed to be an effective sunburn relief treatment. A few glugs added to a cool bath is another common one. Unfortunately, I could find no supporting research for this one, but it appeared on enough “sunburn home remedy” lists that I figured there may be something to it. Anyone try it out themselves?
Coconut Oil
Coconut oil can seemingly do it all. Numerous readers use it as sunblock, and just as many use it to soothe already established burns. I recall Bear Grylls smearing smashed coconut all over his face and arms to prevent and soothe sunburn during an episode of Man v. Wild, so perhaps there’s something to it.
I wish there were more definitive answers for this one, but I fear that smug “an ounce of prevention” jerk may be right this time.
What are your tried and true home remedies for a bad sunburn? I’m consistently impressed with the advice and insights you guys dole out in the comment section and in emails, so let’s hear what you’ve got. What works? What doesn’t? Let me know, and thanks for reading!
Thursday, 23 June 2016
10 sunburn-soothing tips
Try one of these home sunburn remedies to care for your stinging skin
It’s hard to resist soaking up the first few rays of summer sunshine, but sometimes lounging in the sun can come with a price. If you forget to put on sunblock, you can end up with a nasty sunburn. The outer layers of your skin become inflamed by overexposure to the sun’s ultraviolet rays, and the affected area gets hot and tender. Fortunately, there are some tried and true home sunburn remedies that can soothe your stinging skin. Try these ten suggestions to cool off, but remember: repeated sunburns cause your skin to age more rapidly, and increase the risk of cancer, so slather on that sunscreen the next time you venture into the sun.
1. Soak it up. For immediate relief, soak the sunburned areas in cold water (but not ice water) or with cold compresses for 15 minutes. The cold reduces swelling and wicks away heat from your skin.
2. Take a dip. If you’re burned all over, take a soak in a cool bath to which you’ve added oatmeal. You can either buy a colloidal oatmeal product, such as Aveeno, or simply grind up a cup of oatmeal in a food processor and add it to your bath.
3. Give yourself a green tea compress. Brew up a pot of green tea and let it cool. Soak a clean cloth in the tea, and use it as a compress for sunburned areas. The tea contains ingredients that help protect the skin from ultraviolet radiation damage and reduce inflammation.
4. Freshen up with mint. Use the cooling, aromatic qualities of peppermint to quell the scorch of a sunburn. Either make peppermint tea or mix two drops of peppermint oil with a cup of lukewarm water. Chill the concoction and gently bathe the sunburned area.
5. Bring veggies to the rescue. For extra-painful spots of sunburn, rub the area gently with sliced cucumber or potato. They contain compounds that cool the burn and help reduce swelling.
6. Try some vinegar. Vinegar contains acetic acid—one of the components of medications such as Aspirin. It can help ease sunburn pain, itching, and inflammation. Soak a few sheets of paper towels in white vinegar, and apply them to the sunburned areas. Leave them on until the towels are dry. Repeat as needed.
7. Take a vinegary bath. If the sunburn itches, take a cool bath, but add two cups of vinegar to the bathwater before you get in.
8. Coat yourself. Mix baking soda and vinegar to make a thick paste, and slather it over the sunburned areas. Apply the salve before bedtime, and leave it on overnight.
9. Make your bed sunburn-safe. Sprinkle your sheets with cornstarch to minimize painful chafing. (Use this technique only for bad sunburns, since you’ll have to wash the sheets afterward.)
10. Go for aloe. Apply a light coating of pure aloe vera to the sunburned skin, using either a fresh piece from the plant or in the gel form you can buy at the drugstore. If you buy the gel, make sure it’s 100% pure aloe vera.
It’s hard to resist soaking up the first few rays of summer sunshine, but sometimes lounging in the sun can come with a price. If you forget to put on sunblock, you can end up with a nasty sunburn. The outer layers of your skin become inflamed by overexposure to the sun’s ultraviolet rays, and the affected area gets hot and tender. Fortunately, there are some tried and true home sunburn remedies that can soothe your stinging skin. Try these ten suggestions to cool off, but remember: repeated sunburns cause your skin to age more rapidly, and increase the risk of cancer, so slather on that sunscreen the next time you venture into the sun.1. Soak it up. For immediate relief, soak the sunburned areas in cold water (but not ice water) or with cold compresses for 15 minutes. The cold reduces swelling and wicks away heat from your skin.
2. Take a dip. If you’re burned all over, take a soak in a cool bath to which you’ve added oatmeal. You can either buy a colloidal oatmeal product, such as Aveeno, or simply grind up a cup of oatmeal in a food processor and add it to your bath.
3. Give yourself a green tea compress. Brew up a pot of green tea and let it cool. Soak a clean cloth in the tea, and use it as a compress for sunburned areas. The tea contains ingredients that help protect the skin from ultraviolet radiation damage and reduce inflammation.
4. Freshen up with mint. Use the cooling, aromatic qualities of peppermint to quell the scorch of a sunburn. Either make peppermint tea or mix two drops of peppermint oil with a cup of lukewarm water. Chill the concoction and gently bathe the sunburned area.
5. Bring veggies to the rescue. For extra-painful spots of sunburn, rub the area gently with sliced cucumber or potato. They contain compounds that cool the burn and help reduce swelling.
6. Try some vinegar. Vinegar contains acetic acid—one of the components of medications such as Aspirin. It can help ease sunburn pain, itching, and inflammation. Soak a few sheets of paper towels in white vinegar, and apply them to the sunburned areas. Leave them on until the towels are dry. Repeat as needed.
7. Take a vinegary bath. If the sunburn itches, take a cool bath, but add two cups of vinegar to the bathwater before you get in.
8. Coat yourself. Mix baking soda and vinegar to make a thick paste, and slather it over the sunburned areas. Apply the salve before bedtime, and leave it on overnight.
9. Make your bed sunburn-safe. Sprinkle your sheets with cornstarch to minimize painful chafing. (Use this technique only for bad sunburns, since you’ll have to wash the sheets afterward.)
10. Go for aloe. Apply a light coating of pure aloe vera to the sunburned skin, using either a fresh piece from the plant or in the gel form you can buy at the drugstore. If you buy the gel, make sure it’s 100% pure aloe vera.
Some easy natural Home Remedies for Sunburn
The suns UVB (Ultra violet B) rays affect the outer layer of the skin and is more commonly known as what we experience as a being a surface sun burn.Too much time in the sun without protection can result in heightened sensitivity, redness, pain, and even blisters. Although we are using sun screen lotion but it can not prevent totally sun burn.There are home remedies that can remove sunburns naturally:
• Apply coconut water daily on the face, neck and arms. It will remove sunburn quickly.
• Take 3 tablespoons of ground meals and mix it with half cup of yogurt. Rub this mixture on over your neck and face. Wash it off after sometime.
• Two teaspoons oatmeal and a drop of honey must be added to half cup ripe papaya. This mask must be applied and kept for 20 minutes, after which it can be washed off.
• Mix honey and lime in 2:1 proportion and apply on affected area. It can be washed off in 20 minutes.
• A pinch of turmeric must be added to yogurt and must be applied on the face, neck and arms for half hour on a regular basis.
• Cucumber and lime juice serve to cool and lighten sunburn. Therefore, they must be mixed in equal ratio and applied often.
• For sunburn relief, a paste of turmeric, barley and yogurt must be applied on the sunburned area.
• A lotion prepared from vinegar and olive oil must be rubbed on the body before a cool bath.
• Applying a thin layer of sandalwood paste on the affected area can work wonders.
• Aloe Vera is known for its soothing properties, so some pure aloe Vera gel must be applied on the sunburned area for relief.
Sunday, 19 June 2016
3 Effective Homemade Face Packs For Clear Skin
Having clear and beautiful skin is every woman’s dream but with today’s busy schedules, polluted environment and harsh rays of the sun it becomes very hard to maintain a healthy and clear skin. Pimples, blemishes, spots, tanning and other factors stop us from having that clear flawless skin we always have looked forward to. With the growth of the skincare industry this problem can be taken care of but there are lots of other easy ways to achieve a clear and glowing skin too. Here are some homemade face packs which can be made easily to get flawless skin in the natural way.
1. Neem, gram flour and curd face pack:
Ingredients: Some neem leaves/neem powder, 1 tablespoon of gram flour and 1 teaspoon of curd.
1. Put the curd in a bowl.
2. Then add gram flour and make a paste
3. Take some mashed neem leaves/neem powder, and make a mixture of all three ingredients.
4. Use this mixture on the clean face for 10-15 minutes (till dry) and wash off with cold water. The yogurt keeps the skin soft and moisturizes it and the neem leaves help in providing a glowing skin. Neem used in the face packs acts as an antiseptic as well. It also helps soothe eruptions and boils or acne if any. It is great natural agent and is known to provide clear skin from a long time in the past.
2. Almond honey and saffron face pack:
Ingredients: 4/5 almonds soaked in water/milk overnight, 1 teaspoon of honey, some strands of saffron soaked in 2 tablespoon warm milk, 1 teaspoon lemon juice.
1. Take the soaked almonds and grind them into a paste.
2. Add the saffron infused milk to this paste and also add the honey and the lemon juice.
3. Make a smooth paste and apply on the skin evenly, keep it on for 10-15 minutes.
4. Once dry, wash off with cotton pads soaked in milk or cold water. This pack gives a glowing effect. The saffron helps to lighten skin tone and reduce appearance of spots, honey tightens the skin; almond along with the lemon removes the dead skin and this makes the skin clear and glowing.
3. Banana and yogurt face pack:
Ingredients: 1 ripe banana-peeled and mashed, yogurt 1 tablespoon, honey 1 teaspoon, lemon juice 1 teaspoon
1. In a bowl add the mashed banana and yogurt.
2. Later add the honey and lemon juice and mix all into a smooth paste.
3. Use this face pack on the face and the neck and leave it on till its dry and rinse off.
4. Lemon is a natural bleaching agent and will help to give you a glowing clear skin. Banana is great for glowing skin too.
5. The skin of a banana is great for whitening teeth too.
6. Curd is a moisturizing agent as well
1. Neem, gram flour and curd face pack:Ingredients: Some neem leaves/neem powder, 1 tablespoon of gram flour and 1 teaspoon of curd.
1. Put the curd in a bowl.
2. Then add gram flour and make a paste
3. Take some mashed neem leaves/neem powder, and make a mixture of all three ingredients.
4. Use this mixture on the clean face for 10-15 minutes (till dry) and wash off with cold water. The yogurt keeps the skin soft and moisturizes it and the neem leaves help in providing a glowing skin. Neem used in the face packs acts as an antiseptic as well. It also helps soothe eruptions and boils or acne if any. It is great natural agent and is known to provide clear skin from a long time in the past.
2. Almond honey and saffron face pack:
Ingredients: 4/5 almonds soaked in water/milk overnight, 1 teaspoon of honey, some strands of saffron soaked in 2 tablespoon warm milk, 1 teaspoon lemon juice.
1. Take the soaked almonds and grind them into a paste.
2. Add the saffron infused milk to this paste and also add the honey and the lemon juice.
3. Make a smooth paste and apply on the skin evenly, keep it on for 10-15 minutes.
4. Once dry, wash off with cotton pads soaked in milk or cold water. This pack gives a glowing effect. The saffron helps to lighten skin tone and reduce appearance of spots, honey tightens the skin; almond along with the lemon removes the dead skin and this makes the skin clear and glowing.
3. Banana and yogurt face pack:
Ingredients: 1 ripe banana-peeled and mashed, yogurt 1 tablespoon, honey 1 teaspoon, lemon juice 1 teaspoon
1. In a bowl add the mashed banana and yogurt.
2. Later add the honey and lemon juice and mix all into a smooth paste.
3. Use this face pack on the face and the neck and leave it on till its dry and rinse off.
4. Lemon is a natural bleaching agent and will help to give you a glowing clear skin. Banana is great for glowing skin too.
5. The skin of a banana is great for whitening teeth too.
6. Curd is a moisturizing agent as well
Makeup Tips For Fat Face
It is said that having a round face makes you look younger as opposed to having a thin face. Well, that can indeed be true to certain extent, but majority of women curse their fat face or round face as they would think about the intricacies of getting makeup done on their face. As the matter of fact, it is true that the facial features get camouflaged due to the fat content on the face.
However, you need not be skeptical about the application of makeup on your face, as we give you some great makeup tips for a round face on how to enhance your features and highlight your beauty. It is interesting to know that there are many tricks to make your face look thinner and longer
Check out the following tips on how to make your round face look longer and thinner!
Highlights: Highlighter makes the features of your face appear more defined. Make sure you use face powder and bronzer as they are the two main products to fix the problem of your fat face. Take a medium sized brush and dip it in the bronzer. Sweep the bronzer under the jawline, along your nose and across your cheekbones. By highlighting these features, your face will appear slimmer.
Eye Makeup: Make your eyes stand up. This is the best way to make your features highlight is through getting a proper eye makeup done. Make sure your eyes look bigger, this can be done by adding eyeliner to the corners of your eyes. Apply thick mascara to make your eye lashes look longer and thicker. And when it comes to eyeshadow, be a little careful and choose the one that complements your skin tone.
Lips: For lip shade use a nude colour, in order to make your lips fuller and natural. Do not make the mistake of applying red shade or any other bright colour, which would make your lips look as if its bee-stung! Your lips should not stand out as much as your eyes do. The best way to make them look natural is by using neutral pink or beige.
Hair: This is the most important factor. Getting a proper haircut works wonder for a round face. A perfect makeup and hairstyle can make women with round and fat face appear slimmer. If your face is long, consider getting a fringe, and if it is wide, it is recommended for you to go for a straight cut.
These are some of the makeup tips to make your fat round face look slimmer.
However, you need not be skeptical about the application of makeup on your face, as we give you some great makeup tips for a round face on how to enhance your features and highlight your beauty. It is interesting to know that there are many tricks to make your face look thinner and longerCheck out the following tips on how to make your round face look longer and thinner!
Highlights: Highlighter makes the features of your face appear more defined. Make sure you use face powder and bronzer as they are the two main products to fix the problem of your fat face. Take a medium sized brush and dip it in the bronzer. Sweep the bronzer under the jawline, along your nose and across your cheekbones. By highlighting these features, your face will appear slimmer.
Eye Makeup: Make your eyes stand up. This is the best way to make your features highlight is through getting a proper eye makeup done. Make sure your eyes look bigger, this can be done by adding eyeliner to the corners of your eyes. Apply thick mascara to make your eye lashes look longer and thicker. And when it comes to eyeshadow, be a little careful and choose the one that complements your skin tone.
Lips: For lip shade use a nude colour, in order to make your lips fuller and natural. Do not make the mistake of applying red shade or any other bright colour, which would make your lips look as if its bee-stung! Your lips should not stand out as much as your eyes do. The best way to make them look natural is by using neutral pink or beige.
Hair: This is the most important factor. Getting a proper haircut works wonder for a round face. A perfect makeup and hairstyle can make women with round and fat face appear slimmer. If your face is long, consider getting a fringe, and if it is wide, it is recommended for you to go for a straight cut.
These are some of the makeup tips to make your fat round face look slimmer.
Saturday, 18 June 2016
Homemade Cucumber and watermelon face mask
For fair and glowing skin, the best homemade face mask for any type of skin is Cucumber and watermelon face mask, which is also easy to prepare.

Ingredients:
Cucumber juice 2 tblsp
Watermelon juice 2 tblsp
Yogurt 1 tsp
Milk Powder 1 tsp
How to prepare:
Mix Cucumber juice, Watermelon juice, Yogurt and Milk Powder together and apply on your face about 15 mins.
Uses:
Watermelon is one key ingredient to clean your skin and also to remove the blemishes. Watermelon also acts as a toner. Cucumber juice is well known for its skin lightning effect. Yogurt softens and tightens the skin. Milk powder helps in skin lightening and also acts as a cleaning agent.
For: Any Skin Type
Apply a lemon and honey face mask.
This is my number one beauty secret for naturally brighter skin. Every night, after washing your face thoroughly, mix together fresh lemon juice and a half teaspoon of raw manuka honey, or another minimally processed honey you like. Massage the mixture onto your skin and leave on for ten to fifteen minutes. Rinse off with cold water and check out your gloriously bright skin!How does it work? The lemon juice is exfoliating your skin as well as giving it a high-powered boost of Vitamin C. The honey is moisturizing and working its antibacterial magic on your skin along with the lemon. This mask is also good for fighting acne and fading scars.
Try it at home; I can use it every day, but see what suits your skin best. Lemon increases sun sensitivity so avoid spending long hours in the sun the next day.
Best Homemade Face Mask Formula For Every Skin Type !!
If you are tired of your skin and wish to provide a soothing effect to your woeful skin then do not worry. With the following face mask recipes in your bag of tricks, you can magically transform your skin from awful to awesome! So grab a notepad and quickly jot down the following recipes in order to get a beautiful and luscious skin within few minutes and be the envy of all.

1st Recipe for Face Mask: Using Egg Whites :
This recipe has been claimed as one of the best homemade recipes which works as an efficient face mask, moisturizes your skin effectively and makes it smooth. The ingredients and procedure are as follow:
In order to make this simple recipe you would require whites of at least two eggs and a tablespoon of bland yogurt.
Get two eggs and separate the whites from the yellow (the yolks).
Beat the egg whites in a bowl and add in it yogurt. Mix it well and apply the resultant mixture on your face.
Keep it for at least 20 minutes and then rinse it off and pat it dry using towel. You would notice an instant glow!
2nd Recipe for Face Mask: Using Yogurt as well as Oatmeal :
Every skin requires rejuvenation and it could be easily achieved by preparing this simple mask at home which apart from cleansing your face provides nourishment to your skin as well. The ingredients and procedure are as follow:
For making this simple recipe you would require at least 1 tablespoon of grounded oatmeal, a tablespoon of bland yogurt (try to avoid flavored yogurt) and some honey.
Take a bowl and add into it the oatmeal and yogurt and mix them well. Mix warm honey into the already prepared mixture and keep stirring it until properly mixed.
Then apply the mixture on your face and keep it for at least 15 minutes. Rinse off the mixture with lukewarm water and pat your skin dry with towel. In the end do not forget to apply a good moisturizer.
3rd Recipe for Face Mask: Using a Mask made from Clay
This is an easy-to-make homemade mask which efficiently cleanses your face as well as provides a glowing sheen to your face. The ingredients and procedure of making this recipe are as follow:
For making this mask you would require a teaspoon of clay (preferably green), some clay (kaolin), a tablespoon of aloe vera, some rosewater and some rose oil.
In a bowl mix well green clay as well as clay of kaolin in nature. To this paste add some aloe vera, a tablespoon of rosewater as well as some rose oil.
Apply the above paste on your face and keep it for few minutes before rinsing it off with water. You would notice a refreshing effect on your face.
ALSO IF YOU WANT TO LEARN other homemade recipes like
Recipe for Face Mask: Making a Scrub from Sugar,
Recipe for Face Mask: Using Coffee as well as Cocoa,
Recipe for Face Mask: Making a mask out of Pumpkin
Friday, 17 June 2016
Remedies For Getting Rid Of Unwanted Hair On Women’s Face !!
Unwanted hair on the face can be annoying and frustrating for women. Some women have more hair growth than others. But there is no need to worry as there are many methods which can be applied to get rid of hair on the face.
Hormonal medication is one of the chemical treatments which can be used to get rid of hair but it may produce some disagreeable side effects. The best part is, there are many natural methods which can be followed rather than going for chemical treatments.
Using Lemon Juice, Water And Sugar:
A mixture can be made up of lemon juice, water and sugar. This mixture can be applied in the same direction of the hair growth.
It should be left for 15-20 minutes and then rinse it with the clear water. This remedy has to be followed twice a week for effective results.
Using Turmeric And Milk :
A paste of turmeric with milk can also be made .Gently scrub it in circular motion with the help of your fingers. Then wash it with cold water. This method is considered a highly effective method to remove hair.
Using Gram Flour, Water And Milk:
A paste of gram flour can be made with water or milk in which a pinch of turmeric and 1 teaspoon of fresh milk cream is to be added. This paste is to be applied on your face.
One thing that is to be kept in mind is you have to apply the paste in the same direction of the hair growth. Leave it till it gets dry and then scrub off in opposite direction. By following these steps women can get rid of unwanted hair.
Thursday, 16 June 2016
How to Make a Home Made Face Mask to Brighten and Smooth Your Face instantly
Using ingredients found in most kitchens, you can make an all-natural face mask at home. These masks are less expensive than store bought versions, and often the end results are just as dramatic. With key components like honey, egg whites and cinnamon, your face will instantly look brighter and smoother. These homemade ingredients can also help soothe troubled and irritated skin, get rid of pimples and reduce wrinkles and lines on your face.
Things You'll Need
1 egg
5 drops lemon juice
1 tbsp. honey
2 tsp. cinnamon
Makeup sponge or brush
Instructions
1
Mix one egg white in a small dish until it is a thick foam. Egg whites form an excellent base for any homemade face mask and help to reduce the size of your pores.
2
Add three to five drops of lemon juice to your egg white. The lemon juice helps even out your skin tone.
3
Mix 1 tbsp. of honey to the egg whites and lemon juice. Honey contains natural anti-oxidants and can help your skin retain moisture.
4
Sprinkle 1 to 2 tsp. of cinnamon to the mixture. Cinnamon has a number of beneficial properties that help your skin look brighter and reduce lines on your face.
5
Apply the mixture to your skin liberally using your fingers, a makeup sponge or a brush. Let the mixture remain on your skin for 20 to 30 minutes. The mixture will start to make your face feel tight as the egg white dries.
6
Rinse your face thoroughly when finished. Your skin should look brighter and feel soft and smooth. Repeat application as necessary, usually once a week.
Things You'll Need
1 egg5 drops lemon juice
1 tbsp. honey
2 tsp. cinnamon
Makeup sponge or brush
Instructions
1
Mix one egg white in a small dish until it is a thick foam. Egg whites form an excellent base for any homemade face mask and help to reduce the size of your pores.
2
Add three to five drops of lemon juice to your egg white. The lemon juice helps even out your skin tone.
3
Mix 1 tbsp. of honey to the egg whites and lemon juice. Honey contains natural anti-oxidants and can help your skin retain moisture.
4
Sprinkle 1 to 2 tsp. of cinnamon to the mixture. Cinnamon has a number of beneficial properties that help your skin look brighter and reduce lines on your face.
5
Apply the mixture to your skin liberally using your fingers, a makeup sponge or a brush. Let the mixture remain on your skin for 20 to 30 minutes. The mixture will start to make your face feel tight as the egg white dries.
6
Rinse your face thoroughly when finished. Your skin should look brighter and feel soft and smooth. Repeat application as necessary, usually once a week.
Tuesday, 14 June 2016
6 Ways To Get Hairless Skin Naturally
Hair removal has always been a matter of genuine concern since ages. With passage of time it became a necessity and part of our busy lifestyles. Quick fixes, hair removal treatments and painful methods were adopted to strip hair that marred beauty and caused embarrassment.
But these quick fixes not only turn out to be pretty risky, but extremely painful and costly. Waxing comes with excruciating pain and requires proper hygiene. The likelihood of getting allergies, rashes etc. are quite high for Lasers treatments. Besides, they aren’t exactly giving you a permanent riddance from these pesky hairs. So why not go for natural and risk free ways to remove hair. Lined below are some good and natural ways to get rid of unwanted hair:
1. Sugaring
This helps you to get rid of hair from the roots and for a longer duration. The ingredients required for the sugar spa is 2 cups of sugar,1/4th cup lemon and /4th cup water. Heat the pan and mix all the ingredients with continuous stirring, till it turns into a thick brown paste. Allow the paste to cool to a nominal temperature before use. Apply usual methods of waxing to remove hair.
2. Ant oil massage
One of the ancient methods to remove hair is massaging your body with ant oil. This can be used at a very early stage of development for a baby girl, which restricts hair growth, eventually making it permanent. Not only small babies but young women can also use this oil. Before you use, it is advisable to remove the hair for once and then apply ant oil at night for 1 month. It removes hair permanently.
3. Threading
Threading is one of the commonly used ways to remove hair from the sensitive parts of your body like eyes. Applying sugar, wax etc. can damage the delicate facial tissue. A thin cotton thread is used for this purpose which is curled and rolled along the skin, traps hair and lifts it up by the root. This is considered as the best way to get beautifully shaped eye brows.
4. Home made facial
Hairy face causes embarrassment and can be very annoying for women. A better alternative to hair removal creams is a home made facial. The ingredients include lemon juice, water and gram floor mixed thoroughly. Apply this onto your face and leave till it dries. Scrub it off in the direction of growth to peel off unwanted hair.
5. Egg paste
It is the safest method to remove hair from any part of the body. Ingredients include ½ cup egg white, 1/2 cup sugar and ½ cup corn floor, mixed well to make a paste. Apply this on the hairy area and leave for 15 minutes to dry. Scrub it off in the direction of hair growth.
6. Yogurt and chickpea floor paste
Mix equal amounts of yogurt and chickpea and make sure that the paste being made is a thick one. Apply this mixture on your body and let the paste dry for half an hour. After the required time scrub and wash it off.
FACIAL MASSAGE FOR A DOUBLE CHIN:
Pour just a teaspoon of sunflower oil into one hand, rub it into both hands and apply the oil to your neck and face in long, upward and outward sweeping movements. With the fingers, relaxed, use the thumbs to press into the muscle underneath the jaw, starting in the center of the chin and working outwards towards the angle of the jaw bone as well as downwards movement.Do it for 4 minutes everyday.
DIET:
Avoid Soft drinks, chocolates, snacks, junk food-
EXERCISE:
Be regular in morning exercises. Do neck and chin exercise for double chin problem. Rotate your neck 8-10 times a day so as to make it flexible especially if you sit for long hours in front of the computer. Also do more of facial exercise.
Monday, 13 June 2016
10 PROVEN NATURAL WAYS HELP REDUCE ACNE !!
Please do SHARE this Post and help your friends who are trying to find a way to treat their acne
problem.
1. Really do not pick, press or rub your pimples. These actions actually add to the sebum production and rupture the membranes below the actual skin. The infection and sebum will spread underneath
your skin and cause more pimples. Also, you risk increasing the prospects of leaving scars on your face.
2. Wash your face 2 times a day utilizing a mild soap. It is usually better yet if you can buy sulfur-based soap especially for acne. If your skin is too oily, use a soap with benzoyl peroxide.
3. Drink more water day-to-day. "Eight glasses of water daily can keep acne away." says Jennifer Thoden, a respected acne expert. The reason is that water can hold waste out of our system that's why it really helps heal and prevent acne flare-ups.
4. Avoid the use of oily products. Avoid products that include hair pomades, intense oil-based facial moisturizers, and oily cleansers.
5. Keep your face clean. You should never rest your chin on your hands or constantly touch your face. Regularly shampoo your hair and keep it off your face, particularly when you fall asleep.
6. Exercise moderately because it facilitates blood circulation and eliminataion of toxins.
1. Really do not pick, press or rub your pimples. These actions actually add to the sebum production and rupture the membranes below the actual skin. The infection and sebum will spread underneathyour skin and cause more pimples. Also, you risk increasing the prospects of leaving scars on your face.
2. Wash your face 2 times a day utilizing a mild soap. It is usually better yet if you can buy sulfur-based soap especially for acne. If your skin is too oily, use a soap with benzoyl peroxide.
3. Drink more water day-to-day. "Eight glasses of water daily can keep acne away." says Jennifer Thoden, a respected acne expert. The reason is that water can hold waste out of our system that's why it really helps heal and prevent acne flare-ups.
4. Avoid the use of oily products. Avoid products that include hair pomades, intense oil-based facial moisturizers, and oily cleansers.
5. Keep your face clean. You should never rest your chin on your hands or constantly touch your face. Regularly shampoo your hair and keep it off your face, particularly when you fall asleep.
6. Exercise moderately because it facilitates blood circulation and eliminataion of toxins.
Subscribe to:
Comments (Atom)


